Drop Down MenusCSS Drop Down MenuPure CSS Dropdown Menu

Sunday, October 9, 2016

You Can Still Get Windows 10 for Free from Microsoft’s Accessibility Site

You Can Still Get Windows 10 for Free from Microsoft’s Accessibility Site
 The free Windows 10 upgrade offer may technically be over, but it isn’t 100% gone. Microsoft still provides a free Windows 10 upgrade to anyone who checks a box saying they use assistive technologies on their computer. This offer will end at some point, but Microsoft hasn’t announced when.

 How It Works

Microsoft  announced that it wants people who use assistive technologies to be able to upgrade to use the new accessibility features in Windows 10’s Anniversary Update. In the Anniversary Update, the Narrator screen reader is improved and new applications like the Edge browser, Cortana, and Mail offer improved accessibility features. Windows users who use assistive technologies (like the narrator, on-screen keyboard, or high contrast desktop theme) may not have wanted to upgrade before these improvements were made by Microsoft.
Downloading the upgrade tool and taking advantage of the free upgrade, you’re asserting that you use assistive technologies.

How to Upgrade to Windows 10 


The free upgrade offer is simple. To get Windows 10, you’ll just have to visit the “Windows 10 free upgrade for customers who use assistive technologies” page and download the upgrade tool. Like the previous free upgrade offer, this only works if your computer is currently running Windows 7 or Windows 8.1.


Click the “Upgrade Now” button and Run it and you’ll be prompted to agree to the license agreement before continuing.

This seems to be the same free upgrade tool that was made available to the general public as part of the earlier free upgrade offer. Click through the wizard and it will check that your hardware is compatible before automatically downloading and upgrading to Windows 10.
Once the upgrade is complete, your PC will be running Windows 10 and will have a “digital license” that lets you reinstall Windows 10 at any point in the future.
If you upgrade to Windows 10 and decide that you’d like to downgrade later, you can roll back to Windows 7 or 8.1 at any time within the first 30 days. Your PC will still have a digital license, so you can upgrade that computer at any point in the future–even after this free upgrade offer ends.

Saturday, October 12, 2013

Important Windows 8 Keyboard Shortcuts

Important Windows 8 Keyboard Shortcuts


Windows 8 is the latest offering from Microsoft and has reinvented itself as an operating system for both tablet and PC users. It is easy to use Winsdows 8 on a tablet. But if you don’t have a touch screen it is difficult to work on Windows8.

Microsoft introduced newKeyboard shortcuts in windows 8 to navigate through reconstructed OS faster and easier. And as much fun as touchscreens can be. Sometime We can do more with keyboard shortcuts than you can with swipes. Here we discuss about some of the new keyboar shortcuts introduced in Windows 8. 


Important Shortcut Keys For Windows 8

1. Displays Charms Menu : 

   Windows + C


2. Brings up a menu of Windows Control Panel, Command Prompt, Task Manager and File Explorer.

   Windows + X


3. Settings menu for the current applications eg: If you are in start menu, it shows general OS settings.


  Windows + I


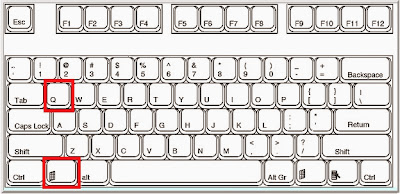
4. Open up the APPS search menu that allows you to search your list of installed programs.

 Windows key + Q


5.   Open Desktop     

  Windows key + D 

6. Opens up Share menu for the current Application
Eg: hitting Windows Key +H in bing allows to emaik or shae information on social networks.

Windows key + H


7. Opens the Task Switcher and Toggles between Windows8- Style Applications.

Windows key + Tab


8. Opens Desktop mode and minimizes all opened windows.

Windows key + M 


9. Opens Universal Search menu and sets it to search settings.

Windows key + W


10. Opens Universal Search menu and sets it to search files.

Windows key + F


11. Opens Run menu where you can launchPrograms by typing the commands.

Windows key + R


12. Opens File Explorer  to the My Computer which shows all your drives.

Windows key + E


13. Opens Desktop mode and make the Nth application on the taskbar active when  ‘N’ is the number key and I is the furthest taskbar icon to the left.

Windows key + 'N' (1 to 9)


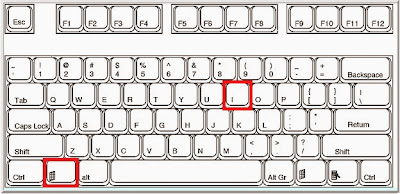
14. Changed the Current Windows8 –style application to the right or left, depending on how many times you hit the button.

Windows key + . ( period/ fullstop)


15. Opens Application menu, which shows contextual options for the active Application.

Windows key + Z


If u need any help please go to our official website www.openpcsupport.com and create a Service Ticket to Get Free Support. 

Create Ticket: Click Here 

We Provide free Support all over the globe.


Wednesday, October 9, 2013

How To Uninstall Avast Free Antivirus From Windows 8, 7, Vista & MAC

How To Remove Avast Free Antvirus From Windows 8,7, Vista & MAC


Sometimes it can be difficult to Uninstall Avast Free Antivirus software from your computer Completely. We can Remove Avast  manually from Control panel but there some files or folders wont remove from Progrma files and may conflict with the reinstallation or installation of other Security softwares like Mcafee, Norton, Kaspersky, AVG  etc.

To Avoid this conflicts with its good to remove Avast Using Avast Uninstall Utility. Let us Discuss about the different steps to Uninstall Avast from Windows8,7, Vista and MAC.

Uninstall Or Remove Avast Free Antivirus Manually From Windows PC

  • Click Start > Go To Control Panel


  • Click on Programs and Fearues or  Uninstall a Program


  •  Right click on Avast Free Antivirus


  • Click on Uninstall. 
  • Avast  Screen will appear , Select  Uninstall  and Click on Next


  •        Click on YES button on Avast.

  •      After completing Uninstallation Process Select Restart  and Click Finish button.

  
    Uninstall or Remove Avast Free Antivirus Using Avast Uninstall Utility

If you are unable to Uninstall Avast Free Antivirus from Control panel then please follow the below Steps to Uninstall Avast Uninstall utility.

1. Download  Avast Uninstall utility “aswclear.exe”  : DOWNLOAD

2.Start Windows in Safemode : Follow the below steps to start windows in        Safemode.
  • Restart  Computer
  • Right after shutting down Keep on pressing F8 button till the computer boot up.


 3. You will get Advanced Boot Option menu

 4. Select Safemode. Use the Up and Down arrow button to select and Press Enter.


5. Open the uninstallation Utility (aswclear.exe) from the saved location and    Run the file.

6. Select the appropriate Avast Product and Click Uninstall.
     

7. If you are getting error message " self defense module" preventing               uninstallation then, launch Avast.
8. Go to Trouble shooting tab
9. Uncheck the Box Enable Avast! self defense module and click OK.


10. This will allow the Avast Uninstallation utility to remove the product.

Uninstallation Of Avast Free Antivirus From MAC

Uninstallation Of Avast Free Antivirus from MAC is much Simpler ComWindows Operating systems. Follow the below steps to Uninstall Avast from MAC.


  1. Launch Avast 
  2. Click on the program name in the menubar
  3. You will see an option to Uninstall
  4. Confirm You want to uninstall the program.


5. No Reboot required.

If u need any help please go to our official website www.openpcsupport.com and create a Service Ticket to Get Free Support. 


Create Ticket:  Click the below link          http://openpcsupport.com/createTicket.php?id=1&action=


We Provide free Support all over the globe.


Tuesday, October 8, 2013

How To Remove Kaspersky Internet Security From Windows 8, 7, Vista and XP


  How to remove Kaspersky Internet Security 2013 ?

Kaspersky Internet security 2013  can be uninstalled from your computer if you no longer use it or if you want to free up space on your hard disk. It can be removed from Windows 8,7,Vista and XP OS using a couple of simple steps.


Toremove Kaspersky Internet Security completely,you have to exit the application first.

1.Right click on the K icon in the taskbar notification area.(bottom right hand corner).


2.Now click on Exit

Uninstallation steps for Windows 8 OS  

1.On the Start Screen,towards the bottom Click on All apps


2.Find and right click Kaspersky Internet Security 2013 on the Apps Screen


3.Select Kaspersky Internet Security 2013 and click Uninstall/Change in Programs and Features window.


4.Now click Next button in the uninstall welcome window    


 5. Now you will be able to see the Saving Objects window where you can  select the objects that you want to be saved after the removal of program.The features which you can save are:

> License information

> Quarantine files  which is active only if malicious objects were previously detected and moved to quarantine

> Application operating settings -customize application operation settings

> iChecker data- This technology is used to accelerate the product functionality.

> Anti-Spam databases which is active only if the Anti Spam component was used.

6. Click Remove to start the removal process in the Ready to Uninstall Window


7. Now you will have to wait until the program files and registry keys are completely removed.

8.Once the removal is finished,reboot your  computer to complete the uninstall process.You can click on YES button to reboot instantly or No to postpone the reboot.The program will be fully removed after the system reboot.


Uninstallation steps for Windows 7 OS and Windows Vista OS

1.Open Programs and Features by clicking the Start button , 
 2. Click Control Panel

 4.Then click Programs and Features Or Uninstall        a Program.

 5.Select  Kaspersky Internet security from the list and then click Uninstall.

 6.If you're prompted for an administrator password or confirmation, type the password or provide confirmation.


Uninstallation steps for Windows XP

 1.Click Start 
 2.Click Control Panel and then double-click Add or Remove Programs. 
   3.In the Currently installed programs box, click Kaspersky Internet security and then click Change or Change/Remove. 
   4.Click Yes if you are prompted to confirm the removal of the program.
   5.Follow the instructions that appear on the screen to make the changes that you want.


If u need any help please go to our official website  www.openpcsupport.com and create a Service Ticket to Get Free Support. 


Create Ticket: Click Here 


We Provide free Support all over the globe.